What is a composed task?
A composed task is a directed graph where each node of the graph is a task application. Spring Cloud Data Flow lets you create a composed task through its browser-based UI, its shell, or its RESTful API. In this section, we show you how you can create and manage composed tasks.
Composed Task 101
Before going into how to create and manage composed tasks, we need to discuss a scenario where we want to launch a sequence of task definitions.
For this discussion, suppose we want to launch task definitions identified as task-a, task-b, and task-c.
For example, we launch task-a, and, if task-a has completed successfully, we want to launch task-b. Once task-b has completed successfully, we want to launch task-c. In this case, the graph would look like the following image:
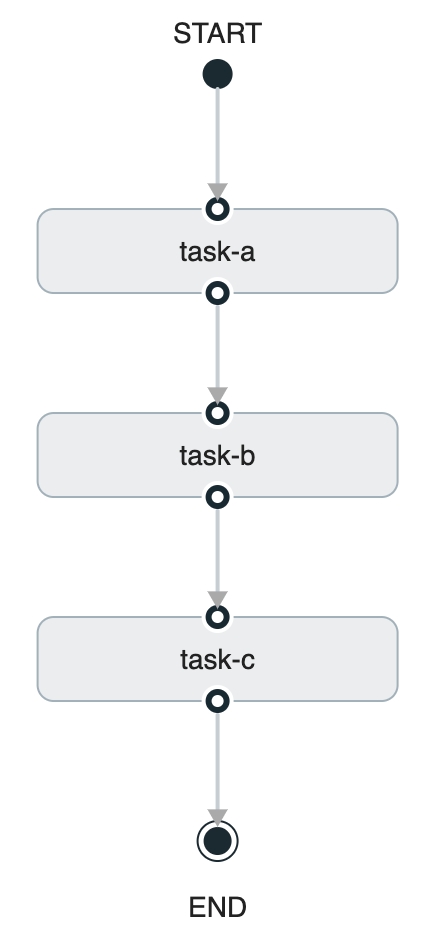

The preceding diagram can be expressed by using Spring Cloud Data Flow's task definition DSL, as follows:
task-a && task-b && task-cThe && in the preceding DSL states that the task definition to the left of the && must complete successfully before the next task definition in the flow can be launched.
Once the preceding composed task definition is created, you can launched it in the same way you would a regular task definition. Behind the scenes, Spring Cloud Data Flow launches the Composed Task Runner application to manage the execution of the composed task graph.
It does this by parsing the Spring Cloud Data Flow task definition and then makes RESTful API calls back to the Spring Cloud Data Flow server to launch the task definitions. As each task completes, it launches the next task definition.
In the following sections, we show you how to create your own composed task graphs, to explore the various ways you can create a composed task flow.
Configuring Spring Cloud Data Flow Launch Composed Tasks
As discussed earlier, the Composed-Task-Runner is an application that manages the execution of the tasks in a composed task graph. So, before creating composed tasks, we need to configure Spring Cloud Data Flow to launch the Composed Task Runner properly.
Configuring Data Flow to Launch the Composed Task Runner
When launching a composed task, Spring Cloud Data Flow passes properties to the Composed-Task-Runner so that it can execute the directed graph properly. To do this, you must configure Spring Cloud Data Flow's dataflow.server.uri property so that Composed Task Runner can make the RESTful API calls to the correct SCDF Server:
dataflow.server.uri: The URI of the Spring Cloud Data Flow Server that is used by theComposed Task Runnerto execute its RESTful API calls. It defaults to https://localhost:9393.spring.cloud.dataflow.task.composedtaskrunner.uri: Establishes where Spring Cloud Data Flow obtains theComposed Task Runnerartifact. By default, Spring Cloud Data Flow retrieves the artifact from Maven Central for thelocalandCloud Foundryplatforms. ForKubernetes, it obtains the artifact from DockerHub.
spring.cloud.dataflow.task.composed.task.runner.uri has been deprecated as of Spring Cloud Data Flow 2.7.0 in favor of spring.cloud.dataflow.task.composedtaskrunner.uri.
spring.cloud.dataflow.task.composedtaskrunner.imagePullSecret: If running within Kubernetes and the Composed Task Runner image resides in a repository that requires authentication, you can configure a secret that contains the credentials to use when pulling the image. The property value is the name of the configured secret that must be created first. Follow the Pull an Image from a Private Registry guide to create the secret.-
maximumConcurrentTasks- Spring Cloud Data Flow lets a user limit the maximum number of concurrently running tasks for each configured platform to prevent the saturation of IaaS/hardware resources. The default limit is set to20for all supported platforms. If the number of concurrently running tasks on a platform instance is greater than or equal to the limit, the next task launch request fails, and an error message is returned through the RESTful API, the Shell, and the UI. You can configure this limit for a platform instance by setting the corresponding deployer property to the number maximum number of concurrent tasks:spring.cloud.dataflow.task.platform.<platform-type>.accounts[<account-name>].deployment.maximumConcurrentTasks`The
<account-name>is the name of a configured platform account (defaultif no accounts are explicitly configured). The<platform-type>refers to one of the currently supported deployers:local,cloudfoundry, orkubernetes.
Changing this property will require Spring Cloud Data Flow to be restarted.
Registering Sample Applications
Before you work with the composed task samples below, you must first register the sample applications that are used in the examples.
So, for this guide, you need to re-register the timestamp application multiple times with the following names: task-a, task-b, task-c, task-d, task-e, and task-f.
Spring Cloud Data Flow supports Maven, HTTP, file, and Docker resources for local deployments. For local, we use the Maven resource.
The URI for a Maven artifact is generally of the form maven://<groupId>:<artifactId>:<version>. The Maven URI for the sample application is as follows:
maven://org.springframework.cloud.task.app:timestamp-task:2.1.0.RELEASEThe maven: protocol specifies a Maven artifact, which is resolved by using the remote and local Maven repositories configured for the Data Flow server.
To register an application, click the Applications tab on the left side of the page. Select Add Applications and Register one or more applications. For task-a fill in the form, as shown in the following image, and click Register the application(s).
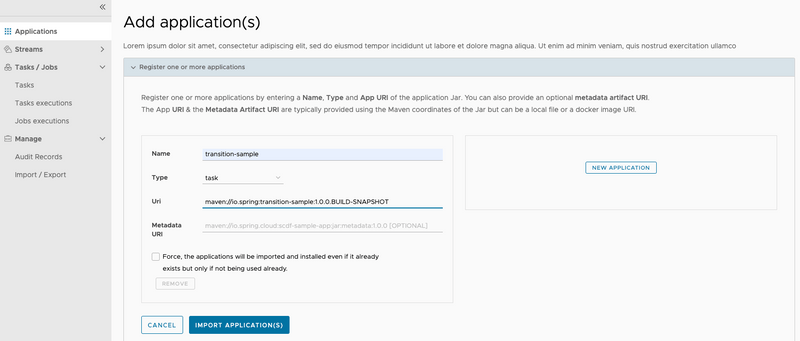
Repeat this registration for task-a, task-b, task-c, task-d, task-e, and task-f while using the same URI: maven://org.springframework.cloud.task.app:timestamp-task:2.1.0.RELEASE.
Spring Cloud Data Flow supports Maven, HTTP, and Docker resources for local deployments. For Cloud Foundry, we use an HTTP (actually, HTTPS) resource. The URI for an HTTPS resource is of the form https://<web-path>/<artifactName>-<version>.jar. Spring Cloud Data Flow then pulls the artifact from the HTTPS URI.
The HTTPS URI for the sample application is as follows:
https://repo.spring.io/libs-snapshot/org/springframework/cloud/task/app/timestamp-task/2.1.0.RELEASE/timestamp-task-2.1.0.RELEASE.jarTo register an application, click the Applications tab on the left side of the page. Select Add Applications and Register one or more applications. Fill in the form, as shown in the following image, and click Register the application(s).
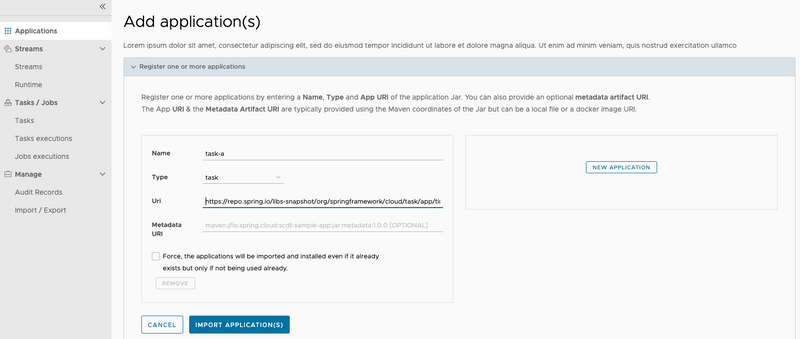
task-a, task-b, task-c, task-d, task-e, and task-f while using the same URI:
https://repo.spring.io/libs-snapshot/org/springframework/cloud/task/app/timestamp-task/2.1.0.RELEASE/timestamp-task-2.1.0.RELEASE.jar`Spring Cloud Data Flow supports Docker resources for Kubernetes deployments.
The URI for a Docker image is the form docker:<docker-image-path>/<imageName>:<version> and is resolved by using the Docker registry configured for the Data Flow task platform and image pull policy.
The Docker URI for the sample app is as follows:
docker:springcloudtask/timestamp-task:2.1.0.RELEASETo register an application, click the Applications tab on the left side of the page. Select Add Applications and Register one or more applications. Fill in the form, as shown in the following image, and click Register the application(s).
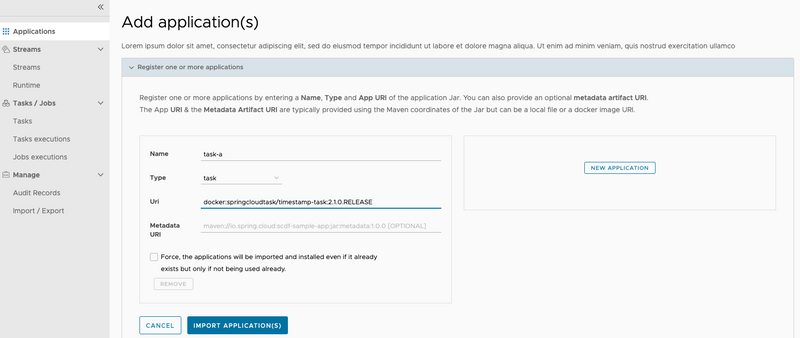
Repeat this registration for task-a, task-b, task-c, task-d, task-e, and task-f while using the same URI: docker:springcloudtask/timestamp-task:2.1.0.RELEASE.
If Maven Central or DockerHub cannot be reached for a given Spring Cloud Data Flow
deployment a different URI can be specified to retrieve the Composed Task Runner using the
spring.cloud.dataflow.task.composed.task.runner.uri property.
The Transition Sample Project
To explore some of the flows that are available through a composed task diagram, we need an application
that lets us configure its exit status at startup time. This transition-sample gives us the ability to explore various flows through a composed task diagram.
Getting the Transition Sample Project from Github
We need to pull the project from Github:
- Open a terminal session.
- Choose a working directory where you want to clone the project.
-
From the working directory, run the following git command:
git clone https://github.com/spring-cloud/spring-cloud-dataflow-samples.git -
Go into the spring-cloud-dataflow-samples/transition-sample directory
cd spring-cloud-dataflow-samples/transition-sample
Building the Transition Sample Project
To build the application, use the following command:
./mvnw clean installTo build the Docker image, use the following command:
./mvnw dockerfile:buildRegistering the Transition Sample
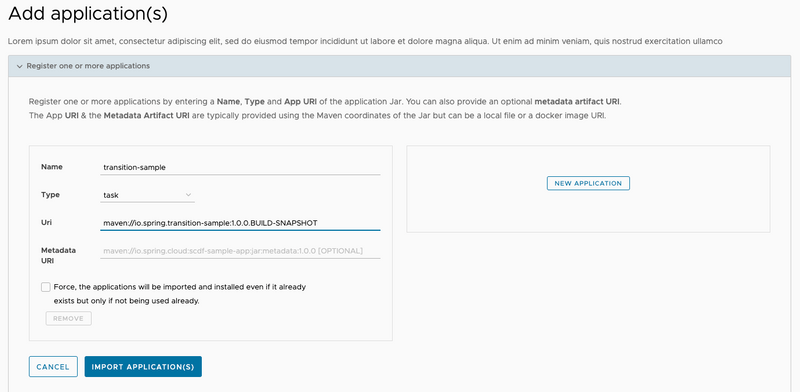
For local deployments, Spring Cloud Data Flow supports Maven, HTTP, file, and Docker resources. For this example, we use the Maven resource.
The URI for a Maven artifact is generally of the form maven://<groupId>:<artifactId>:<version>. The Maven URI for the sample application is as follows:
maven://io.spring:transition-sample:1.0.0.BUILD-SNAPSHOTThe maven: protocol specifies a Maven artifact, which is resolved by using the remote and local Maven repositories configured for the Data Flow server.
To register an application, click the Applications tab on the left side of the page. Select Add Applications and Register one or more applications. Fill in the form, as shown in the following image, and click Register the application(s).
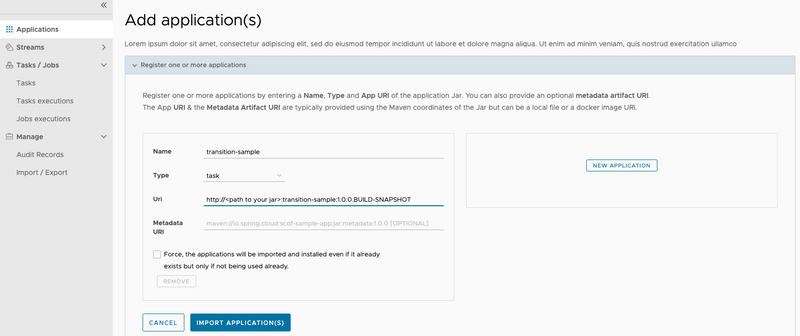
Spring Cloud Data Flow supports Maven, HTTP, and Docker resources for local deployments. For this example, we use an HTTP (actually, HTTPS) resource. The URI for an HTTPS resource is of the form https://<web-path>/<artifactName>-<version>.jar. Spring Cloud Data Flow then pulls the artifact from the HTTPS URI.
The HTTPS URI for the sample app is as follows:
http://<path to your jar>:transition-sample:1.0.0.BUILD-SNAPSHOTTo register an application, click the Applications tab on the left side of the page. Select Add Applications and Register one or more applications. Fill in the form, as shown in the following image, and click Register the application(s).
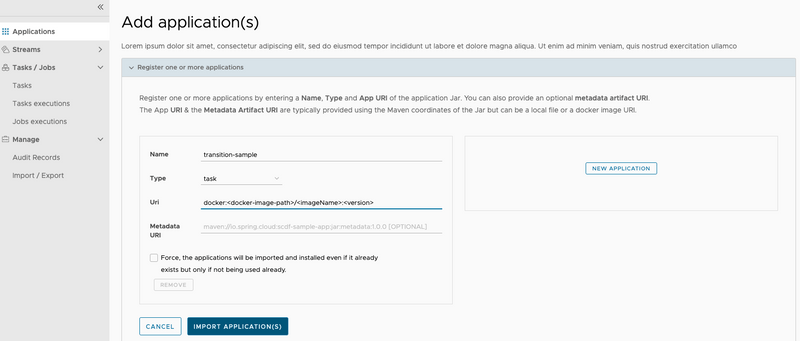
Spring Cloud Data Flow supports Docker resources for Kubernetes deployments.
The URI for a Docker image is of the form docker:<docker-image-path>/<imageName>:<version> and is resolved by using the Docker registry configured for the Data Flow task platform and image pull policy.
The Docker URI for the sample app is as follows:
docker:springcloud/transition-sample:latestTo register an application, click the Applications tab on the left side of the page. Select Add Applications and Register one or more applications. Fill in the form, as shown in the following image, and click Register the application(s).
Building a Composed Task
This section explores the three foundation structures supported by Spring Cloud Data Flow:
- Conditional Execution
- Transitional Execution
- Split Execution
Conditional Execution
Conditional execution is expressed by using a double ampersand symbol &&. This lets each task in the sequence be launched only if the previous task successfully completed.
Create Conditional Execution Composed Task Definition
To create your conditional execution by using the Spring Cloud Data Flow UI, click the Tasks tab on the left hand side of the dashboard and then press the CREATE TASK button at the top of the page. Now copy the following expression and paste it in the text box located at the top of the page:
task-a && task-bYou can see the graph appear in the dashboard, as the following image shows:
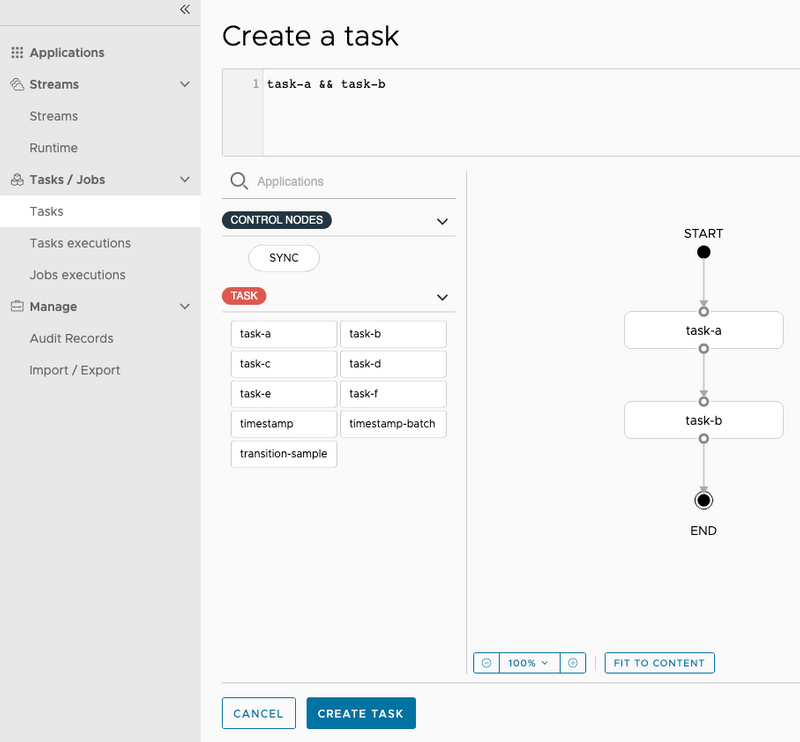
In the preceding example, note that we used task-a and task-b labels. This is necessary because we use two timestamp applications in the same graph.
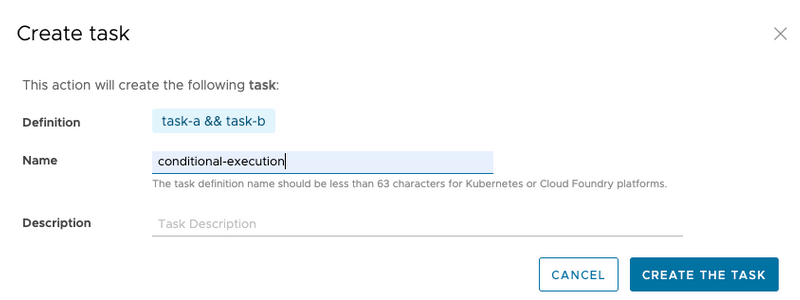
Now press the Create Task button at the bottom of the page. A dialog asks you to Confirm Task Creation. To do so, enter conditional-execution as the composed task name in the Name field and click the Create the task button, as the following image shows:
Now the Task Definition page is displayed, and you can see that three task definitions were created, as the following image shows:

- The
conditional-executiontask definition is theComposed-Task-Runnerapplication that manages the execution of the directed-graph. - The
conditional-execution-task-ais the task definition that represents thetask-aapp defined in the DSL you entered earlier. - The
conditional-execution-task-bis the task definition that represents thetask-bapp defined in the DSL you entered earlier.
Launch Conditional Execution Composed Task Definition
To launch the composed task, click the dropdown icon to the left of the task definition named conditional-execution and select the Launch option, as the following image shows:

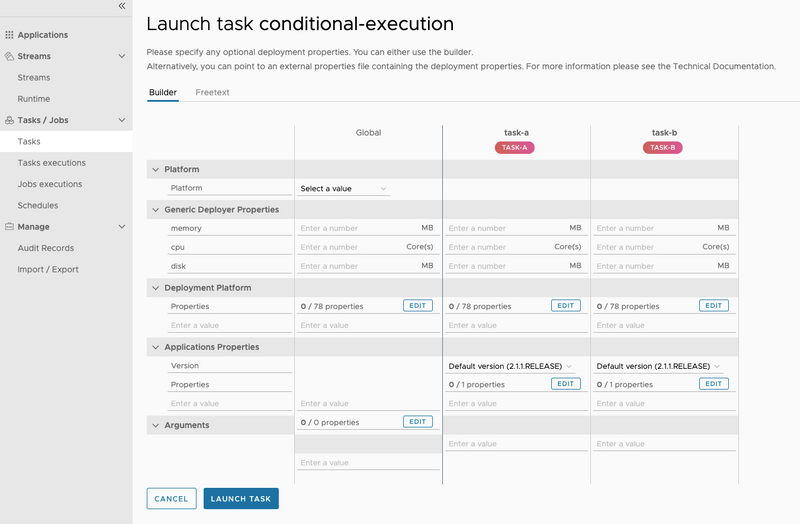
conditional-execution is launched, it launches the task called conditional-execution-task-a, and, if it completes successfully, the task called conditional-execution-task-b is launched. If conditional-execution-task-a fails, conditional-execution-task-b does not launch.
Check the Status of the Conditional Execution Composed Task Definition
Now that we have executed the conditional-execution task definition, we can check the task execution status.
To do so, click the Executions tab on top of the Tasks page. From here, we can see that the conditional-execution (Composed-Task-Runner) successfully launched each of the child apps (conditional-execution-task-a and conditional-execution-task-b), as the following image shows:

Transitional Execution
Transitions let you specify the branch of a tree you want the flow to follow. A task transition is represented by the following symbol ->. To demonstrate, we create a basic transition graph.
Create Basic Transition Task Definition
To create a basic transition by using the Spring Cloud Data Flow UI, click the Tasks tab on the left side of the dashboard and then press the CREATE TASK button at the top of the page. Now copy the following expression and paste it in the text box located at the top of the page:
transition-sample 'FAILED' -> task-a 'COMPLETED' -> task-bIt should look like the following:
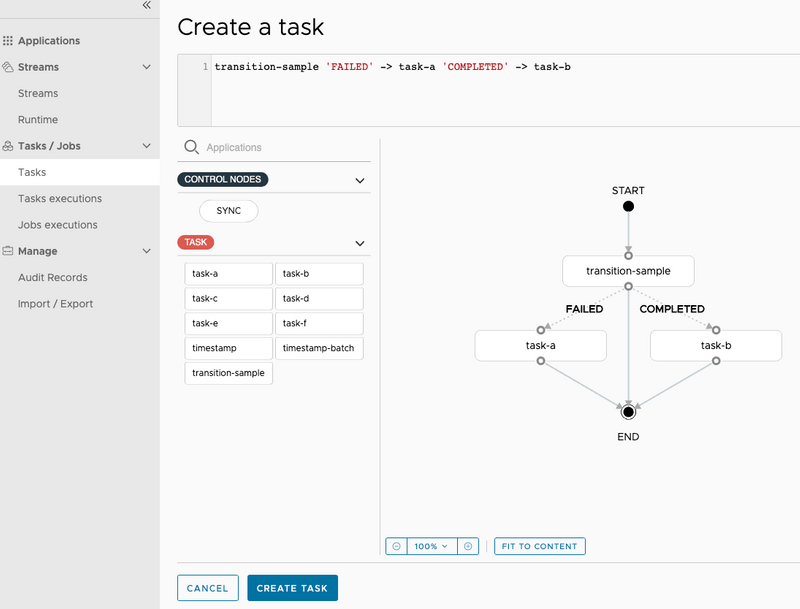
You can use Spring Cloud Data Flow UI's drag and drop capabilities to draw the graph vs. using the DSL.
Now that the graph is rendered, we can dig into the details.
The first application to be launched is transition-sample. Since transition-sample is a Spring Cloud Task application, Spring Cloud Task records the exit message to the database at the end of the execution. This message will have one of the following values:
COMPLETED: The task completed successfully.FAILED: The task failed during its execution.- A custom exit message: A Spring Cloud Task application can return a custom exit message, as discussed in the Spring Cloud Task documentation.
Once the transition-sample application's execution is complete, the composed task runner checks the exit message for transition-sample and then evaluates which of the paths it should take. In our case, its has two paths (as denoted by the -> operator).
FAILED: Iftransition-samplereturnsFAILED, thetimestampapp labeledtask-ais executed.COMPLETED: Iftransition-samplereturnsCOMPLETED, thetimestampapp labeledtask-bis executed.
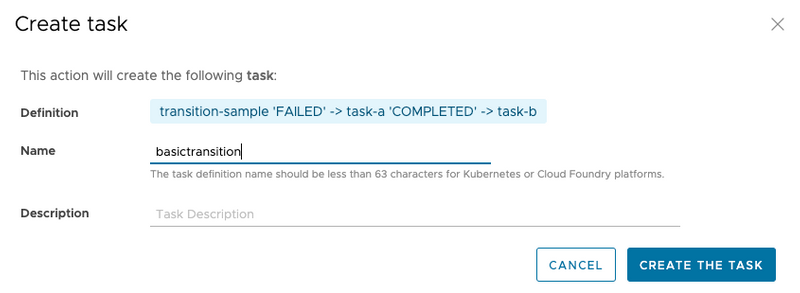
Now press the Create Task button at the bottom of the page. Now a dialog asks you to Confirm Task Creation. To do so, enter basictransition as the composed task name in the Name field and click the Create the task button, as the following image shows:
Launch the Composed Task Definition
Now we can launch our composed task a couple of times so that we can exercise its paths through the tree.
First, we can see what happens if we set the exit message to FAILED.
To do so, select the basictransition Composed Task Runner to be executed, as the following image shows:

First set the interval between checks for the composed task runner to 1000 milliseconds. This is done by clicking the EDIT button on the CTR properties under the Global column as shown below:
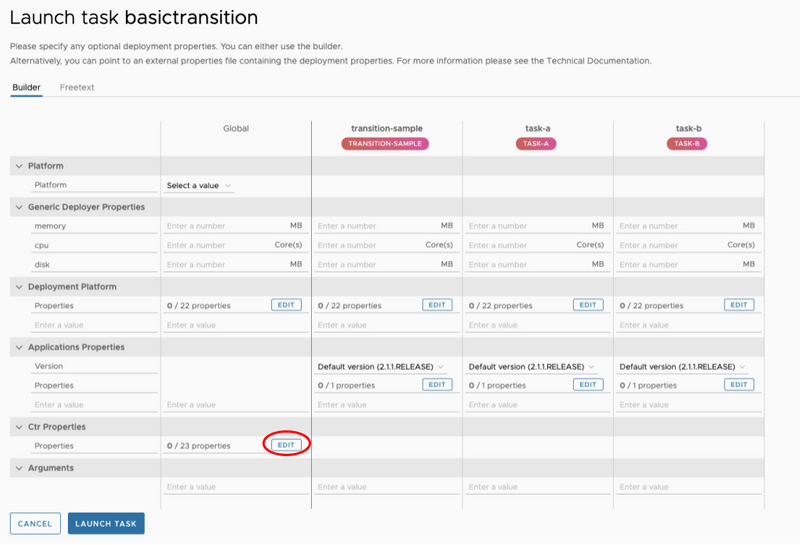
interval-time-between-checks field
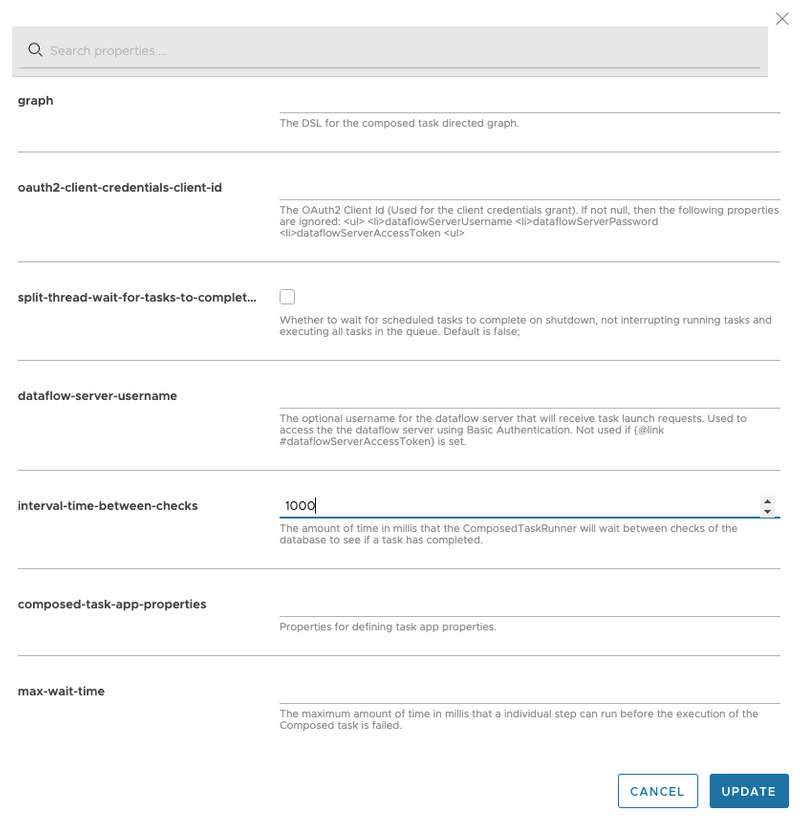
UPDATE button.
Now let's set the transition app to return an exit message of FAILED. This is done by clicking the EDIT button on the Application properties under the transition-sample column.
Once the update dialog appears enter FAILED into the exit-message row as shown below:
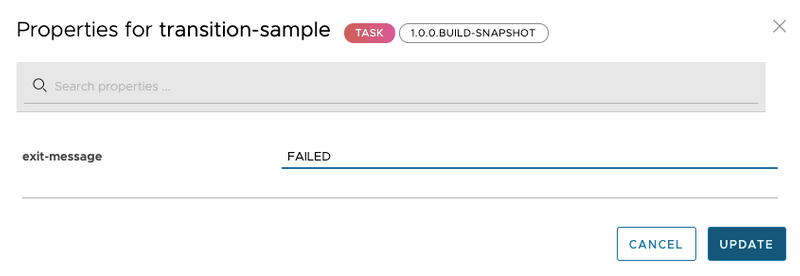
Click the UPDATE button.
Now Click the LAUNCH TASK button.
Now that it has been executed, we can verify that the FAILED path was actually followed. We can do so by clicking the Task executions tab on the left side of the task page:

Doing so shows us that the Composed Task Runner controlling the composed task execution basic-transition was launched and that transition-sample was launched. From there, the FAILED branch was executed, as denoted by basictransition-task-a was launched.
Now relaunch the Composed Task Runner and set the exit-message to COMPLETED to exercise the other branch. To do so, select the basictransition to be executed, as the following image shows:

This is done by clicking the EDIT button on the Application properties under the transition-sample column.
Once the update dialog appears enter COMPLETED into the exit-message row as shown below:
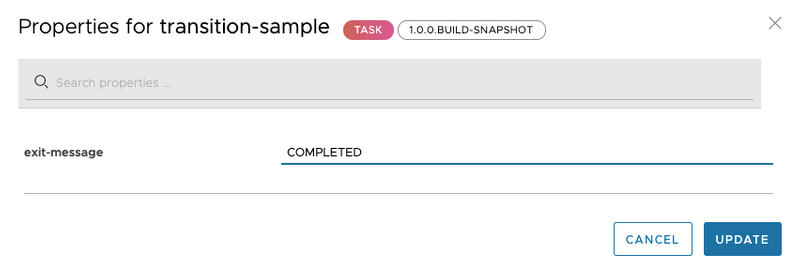
Click the UPDATE button.
Click the LAUNCH TASK button.
Now that it has been executed, we can verify that the COMPLETED path was followed. You can do so by pressing the Task executions tab on the left side of the page:

Are There More States to a Transition?
Now what happens if I were to enter FOO for the exit message?
To do so, select the basictransition Composed Task Runner to be executed, as the following image shows:

EDIT button on the Application properties under the transition-sample column.
Once the update dialog appears enter FOO into the exit-message row as shown below:
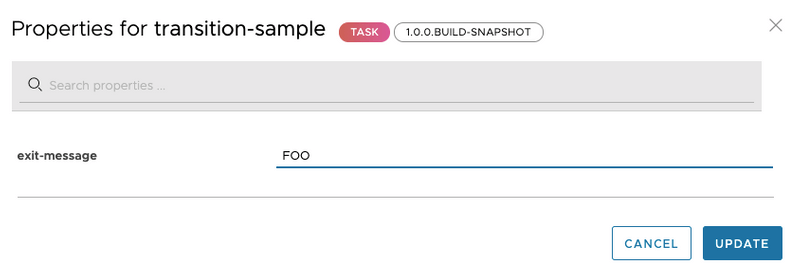
UPDATE button.
Click the LAUNCH TASK button.
Now that it has been executed, we can verify that path FOO was actually followed. To do so, click the Task executions tab on the left side of the page:

In this case, we see that the composed task ended with merely running the Composed Task Runner and the transition sample. This was because FOO was not targeted. How would we handle that -- that is, have a path for COMPLETED, FAILED, and everything else?
In this case, we would want to create another composed task by using a wild card.
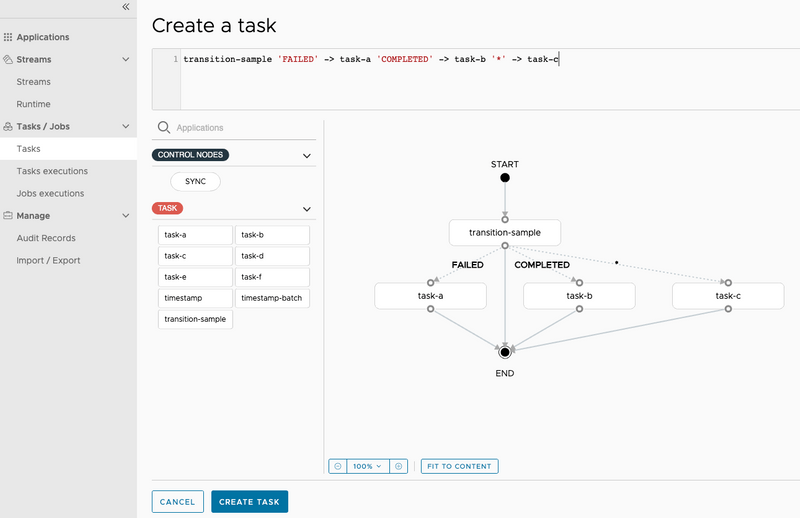
To create your basic transition by using the Spring Cloud Data Flow UI, click the Tasks tab on the left side of the dashboard and then press the CREATE TASK button at the top of the page. Now copy the following expression and paste it in the text box at the top of the page:
transition-sample 'FAILED' -> task-a 'COMPLETED' -> task-b '*' -> task-cIt should look like the following:
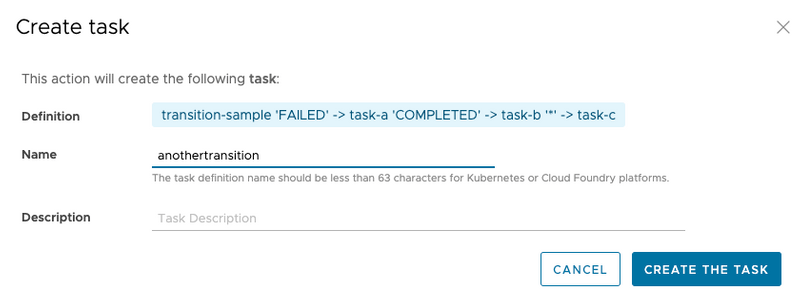
anothertransition as the composed task name in the Name field and click the Create the task button, as the following image shows:
To do so, select the anothertransition Composed Task Runner to be executed, as the following image shows:

Arguments:
--increment-instance-enabled=true
--interval-time-between-checks=1000
Parameters:
app.anothertransition.transition-sample.taskapp.exitMessage=FOOOnce the launch page appears click the EDIT button on the Application properties under the transition-sample column.
Once the update dialog appears enter FOO into the exit-message row as shown below:

UPDATE button.
Click the LAUNCH TASK button.
Now verify that path FOO was actually followed. To do so, click the Executions tab at the top of the task page:

In this case, we see that the wildcard catches all other exit messages. We can verify by seeing that anothertransition-task-c was launched.
Split Execution
What if we want to execute multiple tasks at the same time? The Composed Task DSL supports the concept of a split, to let you do just that. The task definition DSL supports a concept of a split that lets you launch multiple task apps at the same time. Each split contains a list of tasks that are contained within the less than < and greater than > symbol and delimited by twp pipe symbols (||).
For example, if we wanted to launch three tasks at the same time, the DSL would look like:
<task-a || task-b || task-c>Now we can create a composed task that contains both a split and a transition, to show the possibilities. To create your split graph sample by using the Spring Cloud Data Flow UI, click the Tasks tab on the left-hand side of the dashboard and then click the CREATE TASK button at the top of the page. Now copy the expression below and paste it in the text box at the top of the page:
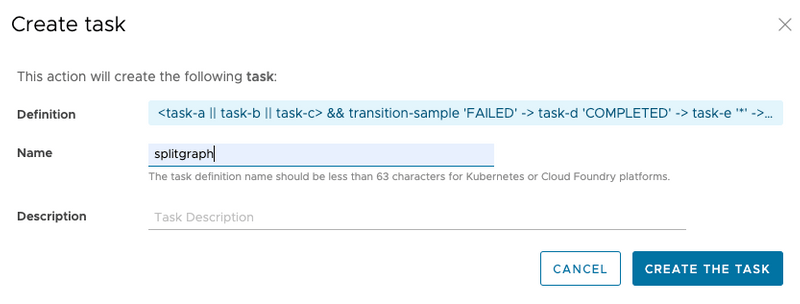
<task-a || task-b || task-c> && transition-sample 'FAILED' -> task-d 'COMPLETED' -> task-e '*' -> task-fIt should look like the following:
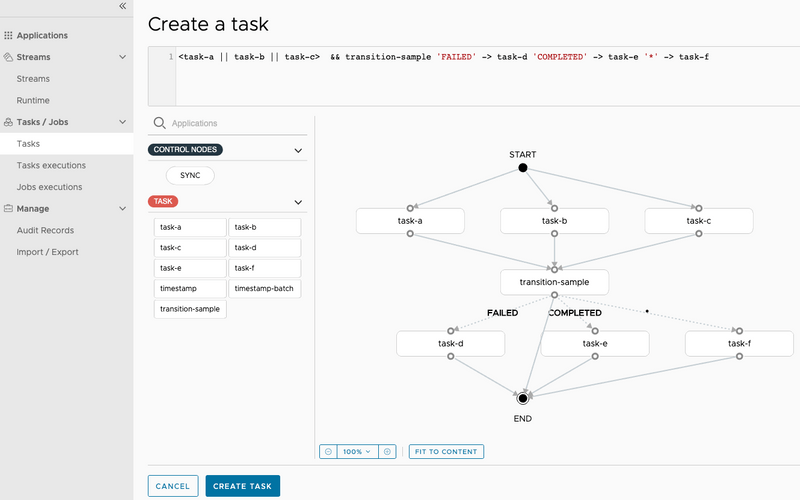
splitgraph as the composed task name in the Name field and press the Create the task button, as the following image shows:
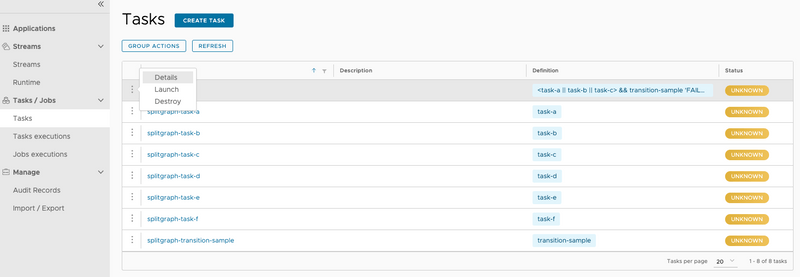
Select the splitgraph Composed Task Runner to be executed, as the following image shows:
EDIT button on the CTR properties under the Global column as shown below:

- Enter
1000in theinterval-time-between-checksfield - Enter
4into thread-core-pool-size field - Enter
trueinto closecontext-enabled field
It should look something like below:

UPDATE button.
Click the EDIT button on the Application properties under the transition-sample column.
Once the update dialog appears enter FOO into the exit-message row as shown below:

UPDATE button.
Click the LAUNCH TASK button.
Verify that all tasks were launched and that the path FOO was actually followed. To do so, click the Task executions tab on the left side of the task page:

In this example, we see that splitgraph-task-a, splitgraph-task-b, and splitgraph-task-c were fired simultaneously before CTR launched our transition app. We also added a new argument: --split-thread-core-pool-size=4. It basically states that the composed task runner can run four apps simultaneously.
Arguments and Properties
Again, what is all that stuff I put in the command line? So, for this example we wanted to show how to use both command line arguments and properties. We used the arguments to establish the properties for the Composed Task Runner:
interval-time-between-checks=1000states that theComposed Task Runnerwill wait one second between checks to make sure that a task is complete (the default is 10 seconds).split-thread-core-pool-size=4states that we want up to four simultaneous tasks to run at the same time.closecontext-enabled=truestates that we want the Spring context to close when theComposed Task Runner.
When using split you must set the spring.cloud.task.closecontext-enabled property as shown above.
Configuring Your Split
In the example shown in the preceding section, we configured the behavior of our split in the composed task by using the spring.cloud.task.closecontext-enabled and split-thread-core-pool-size properties. You can also use the following properties when you use splits:
spring.cloud.task.closecontext-enabled: When using splits, this property is required to be set totruebecause, otherwise, the context does not close (because threads were allocated to support the split).split-thread-core-pool-size: Establishes the initial number of threads required for the splits in the composed task. Each task app contained in a split requires a thread in order to execute. (Defaults to 1)split-thread-max-pool-size: The maximum number threads to be allocated.split-thread-queue-capacity: The number of tasks that should be enqueued if all threads are in use before a new thread is allocated.
Basic Split Sizing
The simplest configuration for splits is to set the split-thread-core-pool-size property. You want to look at your graph and count the split that has the largest number of task apps.
This is the number of threads you need. To set the thread count, use the split-thread-core-pool-size property (defaults to 1).
So, for example, a definition like: <AAA || BBB || CCC> && <DDD || EEE> would require a split-thread-core-pool-size of 3.
This is because the largest split contains three task apps. A count of 2 would mean that AAA and BBB would run in parallel, but CCC would wait until either AAA or BBB finished. Then DDD and EEE would run in parallel.
Restarting Composed Task Runner when task app fails
Composed tasks in Spring Cloud Data Flow let you re-launch the failed composed task in cases where a task app fails.
A task app in the workflow is considered failed when the application returns a non-zero exitCode.
Detecting a failed composed task
Once a composed task is launched, an application named Composed Task Runner manages the execution of the composed task. Since the Composed Task Runner is built using Spring Batch, Spring Cloud Data Flow uses the Job Executions page to track the success or failure of a composed task's execution.
In the case that the composed task job that manages the workflow fails, the associated exit code of the Command Line Runner will be 0.
This is the default boot behavior for batch jobs.
However, if you require an exit code of 1 if the composed job fails, then set the
spring.cloud.task.batch.fail-on-job-failure property for the composed task runner to true.
Example
In the following example, we have a simple conditional execution composed task:
task-a && task-b && task-cAssume we have created a composed task named my-composed-task and that we now want to launch it by using the UI:
- Launch it by pressing the
playbutton, as the following image shows:
- When the launch page appears press the
LAUNCH TASKbutton. - Once
my-composed-taskhas completed executing, we can see thattask-bwas markedERROR, meaning the application returned a non-zeroexitCode. We can verify this by clicking the Executions tab at the top of the page and viewing the task executions. Note thatmy-composed-task-task-bhas been marked with an exit code of1. This means that this task app returned a non-zero exit code, which stopped the composed task execution.

my-composed-taskand the composed task runner identifies the task app that failed and re-runs it and then continues executing the DSL from that point. - Press the
Jobstab located on the left side of the page. - Now press the dropdown button by the failed
my-composed-taskand select Restart the job, as the following image shows:
- Once the composed task completes, we see a new job for
my-composed-taskthat shows a status ofCOMPLETED.
- Now click the Tasks tab to the left of the page and, when the Task Definition page appears, click the Executions tab at the top. Notice that you have two
Composed Task Runs. The first is the failed composed task execution wheretask-bfailed. Then, on the second execution, we see thatmy-composed-taskComposed Task Runnerstarted the graph at the failed task app (task-b) and completed the composed task, as the following image shows:
Passing Properties
Spring Cloud Data Flow lets you pass both application and deployment properties to Composed Task Runner and to the task apps in the graph.
Passing Properties to Tasks in the Graph
You can set properties for a task in the graph in two ways:
- Setting the property in the task definition.
- Setting the property at composed task launch time.
Setting property in the task definition
You can set a property when writing a composed task definition. You can do so by adding adding the -- token followed by the property to the right of the task application name in the composed task definition. The following example shows how to do so:
task-a --myproperty=value1 --anotherproperty=value2 && task-b --mybproperty=value3In the preceding example, task-a has two properties set, and task-b has a single property set.
Setting Property at Composed Task Launch Time
As demonstrated in the previous sections both deployment and application properties can be set using the builder tab on the task launch page.
However, if you wish to set these properties using text you can click the Freetext tab.
Three components make up the property:
-
Property Type: Tells Spring Cloud Data Flow whether the property is either a
deploymentor anapptype.- Deployment properties: Instructions to the deployer responsible for deploying the task app.
- App properties: Properties passed directly the task app.
- Task App Name: The label or the name of the application to which the property should be applied.
- Property Key: The key of the property that is to be set.
The following example sets a myproperty property for a task app named task-a in a composed task named my-composed-task for the following dsl:
task-a && task-bIt would look something like the following:

Similarly if we want to pass a deployer property, the format would remain the same except that the property type would deployer. For example, we need to set the kubernetes.limits.cpu for task-a:
deployer.task-a.kubernetes.limits.cpu=1000mLaunching a composed task and setting both app and deployer properties would be done in the following way by using Freetext tab on the UI:
- Launch the composed task, as the following image shows, by pressing the
Launchselection next to the composed task definition that needs to be launched:
- Set the properties as follows in the
Propertiestext box: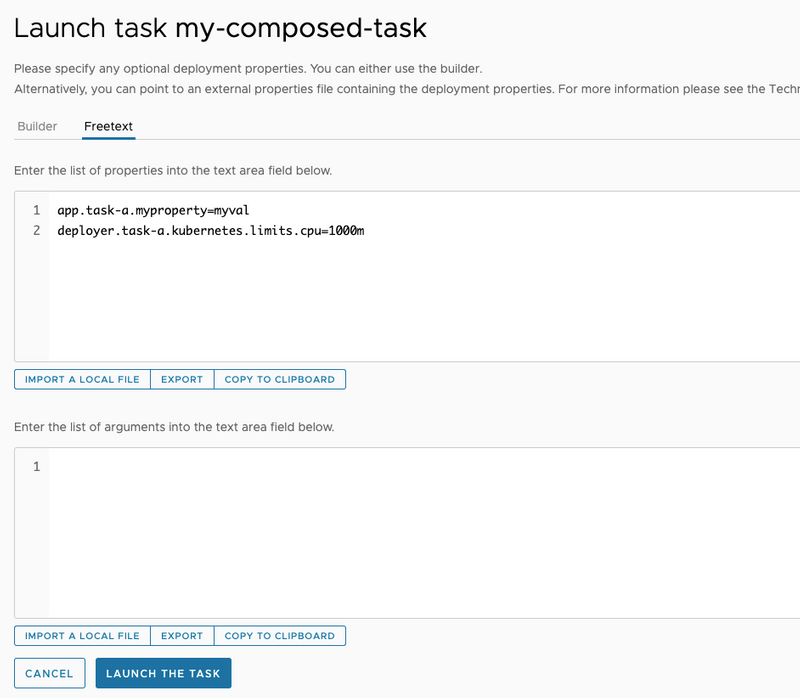
- Now press the LAUNCH TASK button.
Properties set at launch time have a higher precedence than those set at task definition. For example, if property myproperty has been set in the composed task definition and at launch time, the value set at launch time will be used.
Setting Arguments at Composed Task Launch Time
As demonstrated in the previous sections arguments can be set using the builder tab on the task launch page.
However, if you wish to set these arguments using text you can click the Freetext tab.
Three components make up the property:
- Argument Type: This will always be the
apptype. - Task App Name: The label or the name of the application to which the property should be applied.
- Index: Zero based position to where the argument should appear.
The following example sets the myargumentA and myargumentB arguments for a task app named task-a in a composed task named my-composed-task for the following dsl:
task-a && task-bIt would look something like the following:

Launching a composed task and setting arguments would be done in the following way by using Freetext tab on the UI:
- Launch the composed task, as the following image shows, by pressing the
Launchselection next to the composed task definition that needs to be launched:
- Set the arguments as follows in the
Argumentstext box: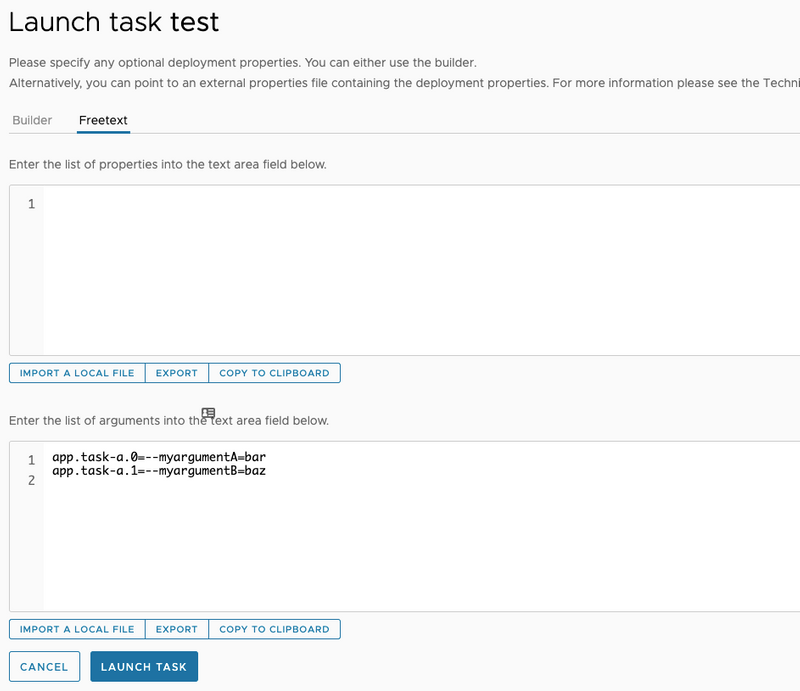
- Now press the LAUNCH TASK buttons.
Passing Properties to Composed Task Runner
Three components make up the property:
-
Property Type: Tells Spring Cloud Data Flow whether the property is either a
deploymentor aapptype.- Deployment properties: Instructions to the deployer responsible for deploying the task app.
- App properties: Properties passed directly to the task app.
- Composed Task Application Name: The name of the composed task runner app.
- Property Key: The key of the property that is to be set.
We can launch a composed task in which we want to pass the following properties to the Composed Task Runner:
increment-instance-enabled: Anappproperty that lets a singleComposed Task Runnerinstance be re-executed without changing the parameters.kubernetes.limits.cpu: Adeployerproperty that sets the Kubernetes CPU limit for the composed task runner. Launching a composed task and setting bothappanddeployerproperties for theComposed Task Runneris done in the following way by using the UI:- Launch a composed task, as the following image shows, by pressing the
playbutton next to the composed task definition that needs to be launched:
- Set the properties in the
propertiestext box, as the following image shows: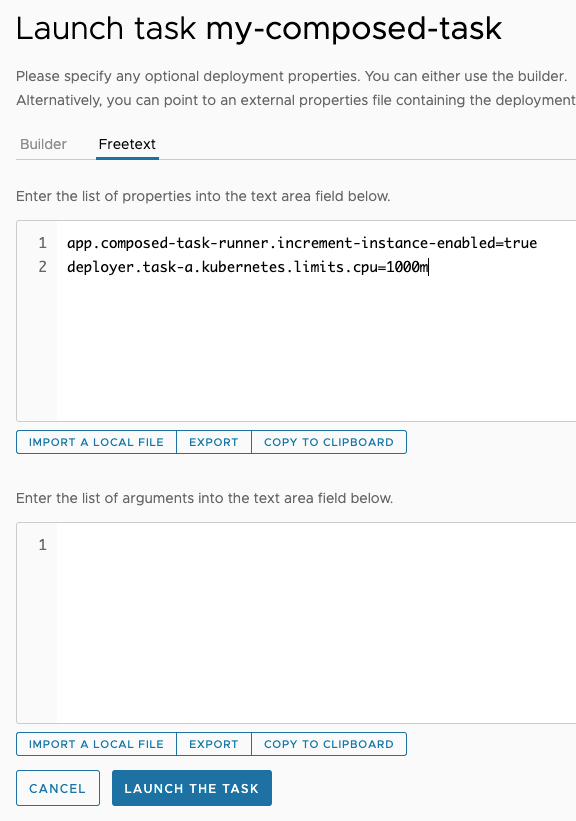
- Press the LAUNCH TASK button.
Launching Composed Task using RESTful API
In this section, we provide an example of how to create and launch a composed-task.
For this example, we want to create a composed task my-composed-task with the following composed task definition:
task-a && task-bUsing curl, the command would look like:
curl 'http://localhost:9393/tasks/definitions' --data-urlencode "name=my-composed-task" --data-urlencode "definition=task-a && task-b"The response from the Spring Cloud Data Flow Server looks something like:
HTTP/1.1 200
Content-Type: application/hal+json
Transfer-Encoding: chunked
Date: Fri, 17 Jan 2020 16:19:04 GMT

{"name":"my-composed-task","dslText":"task-a && task-b","description":"","composed":true,"lastTaskExecution":null,"status":"UNKNOWN","_links":{"self":{"href":"http://localhost:9393/tasks/definitions/my-composed-task"}}}
To verify that the my-composed-task composed task, was created we can execute a curl list:
curl 'http://localhost:9393/tasks/definitions?page=0&size=10&sort=taskName' -i -X GETThe response from the Spring Cloud Data Flow Server looks something like:
HTTP/1.1 200
Content-Type: application/hal+json
Transfer-Encoding: chunked
Date: Fri, 17 Jan 2020 16:24:39 GMT

{"_embedded":{"taskDefinitionResourceList":[{"name":"my-composed-task","dslText":"task-a && task-b","description":"","composed":true,"lastTaskExecution":null,"status":"UNKNOWN","_links":{"self":{"href":"http://localhost:9393/tasks/definitions/my-composed-task"}}},{"name":"my-composed-task-task-a","dslText":"task-a","description":null,"composed":false,"lastTaskExecution":null,"status":"UNKNOWN","_links":{"self":{"href":"http://localhost:9393/tasks/definitions/my-composed-task-task-a"}}},{"name":"my-composed-task-task-b","dslText":"task-b","description":null,"composed":false,"lastTaskExecution":null,"status":"UNKNOWN","_links":{"self":{"href":"http://localhost:9393/tasks/definitions/my-composed-task-task-b"}}}]},"_links":{"self":{"href":"http://localhost:9393/tasks/definitions?page=0&size=10&sort=taskName,asc"}},"page":{"size":10,"totalElements":3,"totalPages":1,"number":0}}
We can launch my-composed-task with the following properties for task-a:
app.task-a.my-prop=goodapp.task-b.my-prop=great
Run the following curl command to launch the task:
curl 'http://localhost:9393/tasks/executions' -i -X POST -d 'name=my-composed-task&properties=app.task-a.my-prop=good,%20app.task-b.my-prop=great'The response from the Spring Cloud Data Flow Server looks something like:
HTTP/1.1 201
Content-Type: application/json
Transfer-Encoding: chunked
Date: Fri, 17 Jan 2020 16:33:06 GMT
To verify that the my-composed-task composed task was executed, we can execute a curl list:
curl 'http://localhost:9393/tasks/executions?page=0&size=10' -i -X GETThe response from the Spring Cloud Data Flow Server looks something like:
HTTP/1.1 200
Content-Type: application/hal+json
Transfer-Encoding: chunked
Date: Fri, 17 Jan 2020 16:35:42 GMT

{"_embedded":{"taskExecutionResourceList":[{"executionId":285,"exitCode":0,"taskName":"my-composed-task-task-b","startTime":"2020-01-17T11:33:24.000-0500","endTime":"2020-01-17T11:33:25.000-0500","exitMessage":null,"arguments":["--spring.cloud.task.parent-execution-id=283","--spring.cloud.data.flow.platformname=default","--spring.cloud.task.executionid=285"],"jobExecutionIds":[],"errorMessage":null,"externalExecutionId":"my-composed-task-task-b-217b8de4-8877-4350-8cc7-001a4347d3b5","parentExecutionId":283,"resourceUrl":"URL [file:////Users/glennrenfro/project/spring-cloud-dataflow-samples/pauseasec/target/pauseasec-1.0.0.BUILD-SNAPSHOT.jar]","appProperties":{"spring.datasource.username":"******","my-prop":"great","spring.datasource.url":"******","spring.datasource.driverClassName":"org.mariadb.jdbc.Driver","spring.cloud.task.name":"my-composed-task-task-b","spring.datasource.password":"******"},"deploymentProperties":{"app.task-b.my-prop":"great"},"taskExecutionStatus":"COMPLETE","_links":{"self":{"href":"http://localhost:9393/tasks/executions/285"}}},{"executionId":284,"exitCode":0,"taskName":"my-composed-task-task-a","startTime":"2020-01-17T11:33:15.000-0500","endTime":"2020-01-17T11:33:15.000-0500","exitMessage":null,"arguments":["--spring.cloud.task.parent-execution-id=283","--spring.cloud.data.flow.platformname=default","--spring.cloud.task.executionid=284"],"jobExecutionIds":[],"errorMessage":null,"externalExecutionId":"my-composed-task-task-a-0806d01f-b08a-4db5-a4d2-ab819e9df5df","parentExecutionId":283,"resourceUrl":"org.springframework.cloud.task.app:timestamp-task:jar:2.1.0.RELEASE","appProperties":{"spring.datasource.username":"******","my-prop":"good","spring.datasource.url":"******","spring.datasource.driverClassName":"org.mariadb.jdbc.Driver","spring.cloud.task.name":"my-composed-task-task-a","spring.datasource.password":"******"},"deploymentProperties":{"app.task-a.my-prop":"good"},"taskExecutionStatus":"COMPLETE","_links":{"self":{"href":"http://localhost:9393/tasks/executions/284"}}},{"executionId":283,"exitCode":0,"taskName":"my-composed-task","startTime":"2020-01-17T11:33:12.000-0500","endTime":"2020-01-17T11:33:33.000-0500","exitMessage":null,"arguments":["--spring.cloud.data.flow.platformname=default","--spring.cloud.task.executionid=283","--spring.cloud.data.flow.taskappname=composed-task-runner"],"jobExecutionIds":[75],"errorMessage":null,"externalExecutionId":"my-composed-task-7a2ad551-a81c-46bf-9661-f9d5f78b27c4","parentExecutionId":null,"resourceUrl":"URL [file:////Users/glennrenfro/project/spring-cloud-task-app-starters/composed-task-runner/apps/composedtaskrunner-task/target/composedtaskrunner-task-2.1.3.BUILD-SNAPSHOT.jar]","appProperties":{"spring.datasource.username":"******","spring.datasource.url":"******","spring.datasource.driverClassName":"org.mariadb.jdbc.Driver","spring.cloud.task.name":"my-composed-task","composed-task-properties":"app.my-composed-task-task-a.app.task-a.my-prop=good, app.my-composed-task-task-b.app.task-b.my-prop=great","graph":"my-composed-task-task-a && my-composed-task-task-b","spring.datasource.password":"******"},"deploymentProperties":{"app.composed-task-runner.composed-task-properties":"app.my-composed-task-task-a.app.task-a.my-prop=good, app.my-composed-task-task-b.app.task-b.my-prop=great"},"taskExecutionStatus":"COMPLETE","_links":{"self":{"href":"http://localhost:9393/tasks/executions/283"}}}]},"_links":{"self":{"href":"http://localhost:9393/tasks/executions?page=0&size=10"}},"page":{"size":10,"totalElements":3,"totalPages":1,"number":0}}```
Configuring Composed Task Runner
This section describes how to configure a composed task runner.
Launching a Composed Task When Security is Enabled
As a user, you have three options for how to launch a composed task when Spring Cloud Data Flow authentication is enabled:
- Basic authentication: Authentication using username and password.
- User-configured access token: When launching a composed task, provide the token you wish to use at launch time by setting the
dataflow-server-access-tokenproperty. - Data Flow-provided user token: If the
dataflow-server-use-user-access-tokenproperty is set totrue, Spring Cloud Data Flow auto-populates thedataflow-server-access-tokenproperty with the access token of the current logged in user. - Client Credentials: When launching a composed task, obtain access token via client credentials.
Basic Authentication
This example launches a composed task where the user provides the username and password. To do so:
- Launch a composed task, as the following image shows, by clicking the
Launchselection next to the composed task definition to launch:
- Now, from the task launch page, populate the
dataflow-server-usernameanddataflow-server-passwordfields. This is done by clicking theEDITbutton on theCTR propertiesunder theGlobalcolumn as shown below:
dataflow-server-usernameanddataflow-server-passwordin the appropriate fields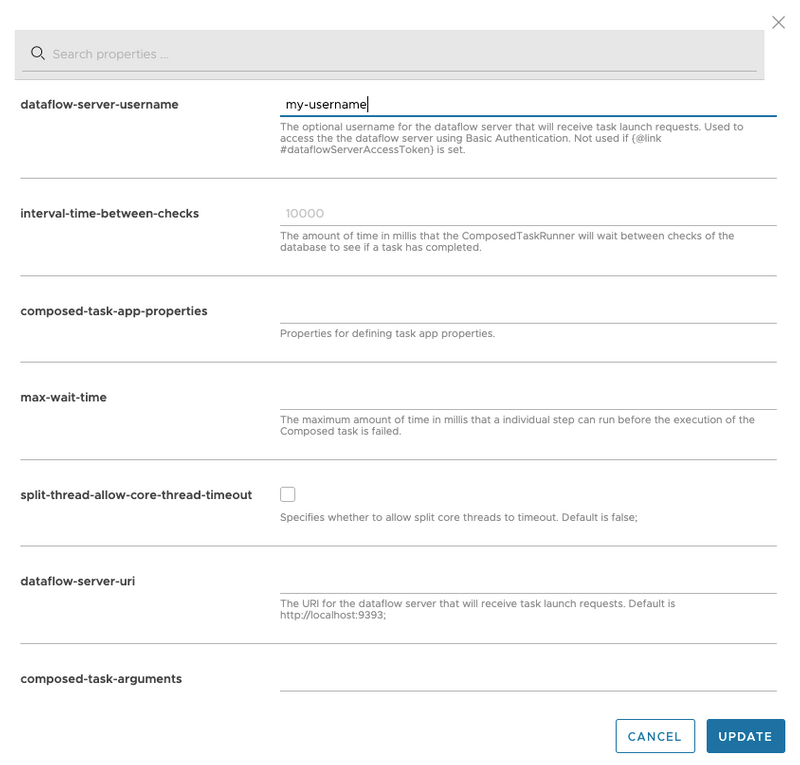
- Click the
UPDATEbutton. - Click the LAUNCH TASK button to launch the composed task.
Using Your Own Access Token
If the composed task needs to be launched with a specific access token, pass the token by using the dataflow-server-access-token property. To do so:
- Launch a composed task, as the following image shows, by clicking the
Launchselection next to the composed task definition to launch:
- Now, from the task launch page, populate the
dataflow-server-use-user-access-tokenfield. This is done by clicking theEDITbutton on theCTR propertiesunder theGlobalcolumn as shown below:
- Now enter the
dataflow-server-access-tokenin the appropriate field.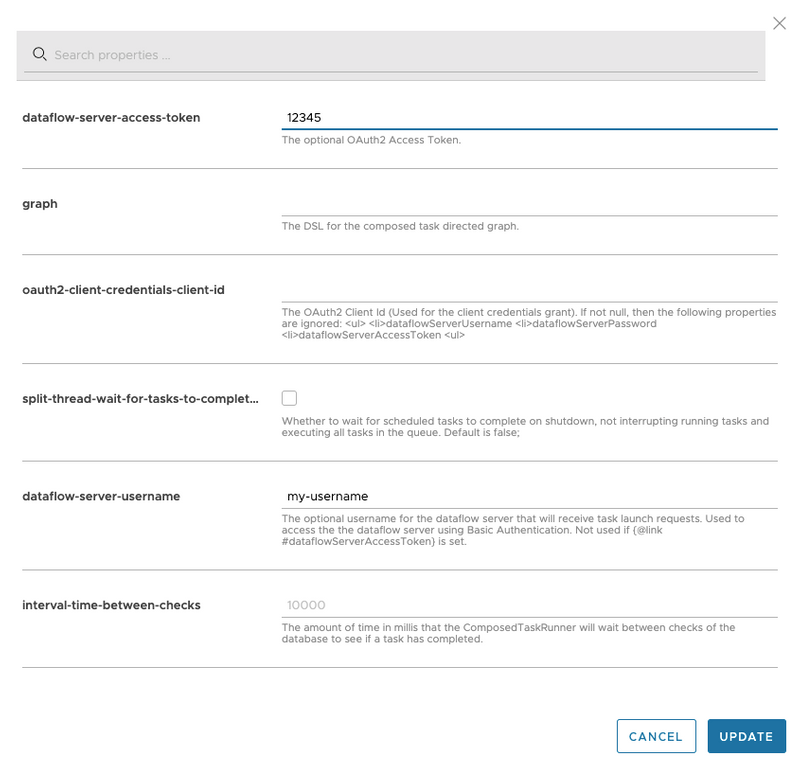
- Click the LAUNCH TASK button to launch the composed task.
User Access Token
In this example, we will launch a composed task where the dataflow-server-use-user-access-token is set to true. To do so:
- Launch a composed task, as the following image shows, by pressing the
Launchselection next to the composed task definition to launch:
- Now, from the task launch page, select
FreetextNow enter thedataflow-server-use-user-access-tokenin the arguments field as follow: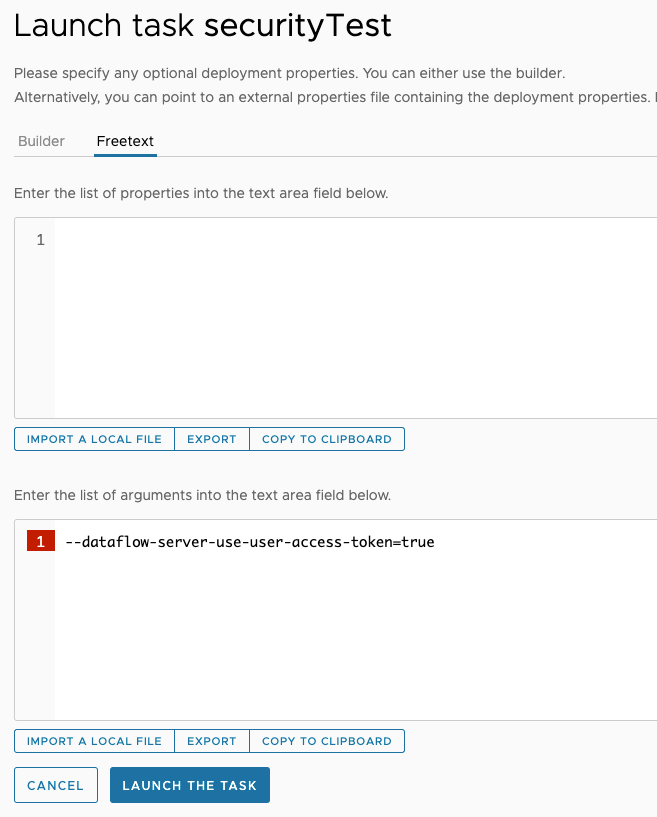
- Click the
UPDATEbutton. - Click the LAUNCH TASK button to launch the composed task.
Client Credentials
If the composed task needs to obtain its access token from an OAuth authentication service, use the following properties:
- oauth2ClientCredentialsClientId
- oauth2ClientCredentialsClientSecret
- oauth2ClientCredentialsTokenUri
- oauth2ClientCredentialsScopes
To do so:
- Launch a composed task, as the following image shows, by clicking the
Launchselection next to the composed task definition to launch:
- Now, from the task launch page, populate the OAuth client credential properties. This is done by clicking the
EDITbutton on theCTR propertiesunder theGlobalcolumn as shown below:
- Now enter the
oauth2ClientCredentialsClientId,oauth2ClientCredentialsClientSecret,oauth2ClientCredentialsTokenUri, andoauth2ClientCredentialsScopesin the appropriate fields.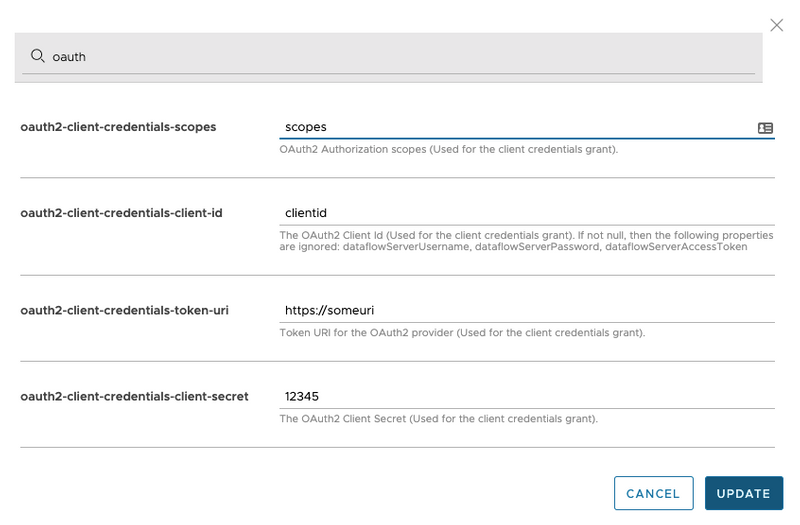
- Click the LAUNCH TASK button to launch the composed task.
NOTE: When using client credentials specifically the OAuth2 Client Id, the following properties are ignored: dataflowServerUsername, dataflowServerPassword, and dataflowServerAccessToken.
Configure the URI for Composed Tasks
When you launch a composed task, Spring Cloud Data Flow launches the Composed Task Runner
application to manage the execution of the composed task graph.
It does so by parsing the Spring Cloud Data Flow task definitions
and then makes RESTful API calls back to the Spring Cloud Data Flow server to
launch the task definitions. As each task completes, it launches the next
task definition. To set the URI that Composed Task Runner
uses to make RESTful API calls, you need to set the SPRING_CLOUD_DATAFLOW_SERVER_URI
property in Spring Cloud Data Flow server. The next two listings show how to do so:
- Kubernetes specification for Spring Cloud Data Flow Server
apiVersion: apps/v1
kind: Deployment
metadata:
  ...
spec:
  ...
  template:
    ...
    spec:
      containers:
        env:
        ...
        - name: SPRING_CLOUD_DATAFLOW_SERVER_URI
          value: '<URI to your SCDF Server>'
...- Cloud Foundry Manifest for Spring Cloud Data Flow Server
---
applications:
  ...
  env:
    ...
    SPRING_CLOUD_DATAFLOW_SERVER_URI: <URI to your SCDF Server>
  services:
    ...