RabbitMQ as Source and Sink
Reading from and writing to RabbitMQ is a very common use-case. Primarily, when the source and sink applications use Spring Cloud Stream's RabbitMQ binder implementation, the configurations can be confusing. The goal of this recipe is to unpack the complexity step by step.
Before we begin, we describe the use-case requirements.
As a user, I want to:
- Consume a
Stringpayload from a queue that runs in an external RabbitMQ cluster. - For every payload, I want to transform it by converting the received
Stringto uppercase. - Finally, I want to publish the transformed payload to a different queue, that again runs in the external RabbitMQ cluster.
To further make it more interesting, we also use the Spring Cloud Stream's RabbitMQ binder implementation in the source, processor, and sink applications.
Configuration
There are two levels of RabbitMQ configurations required for this use case.
- Configuration of RabbitMQ source and sink applications to connect to the external RabbitMQ cluster.
- Configuration of RabbitMQ binder properties at the source, processor, and sink applications. We use a locally running RabbitMQ at
127.0.0.1(aka:localhost) for the binder.
Prerequisite
-
Download the
rabbit-source,transform-processor, andrabbit-sinkapplications.wget https://repo.spring.io/release/org/springframework/cloud/stream/app/rabbit-source-rabbit/2.1.0.RELEASE/rabbit-source-rabbit-2.1.0.RELEASE.jarwget https://repo.spring.io/release/org/springframework/cloud/stream/app/transform-processor-rabbit/2.1.0.RELEASE/transform-processor-rabbit-2.1.0.RELEASE.jarwget https://repo.spring.io/release/org/springframework/cloud/stream/app/rabbit-sink-rabbit/2.1.0.RELEASE/rabbit-sink-rabbit-2.1.0.RELEASE.jar - Start RabbitMQ locally at
127.0.0.1. - Set up external an RabbitMQ cluster and prepare the cluster connection credentials.
Deployment
With all the prerequisites from the previous step complete, we can now start the three applications.
Source
To start the source application, run the following command:
java -jar rabbit-source-rabbit-2.1.0.RELEASE.jar --server.port=9001 --rabbit.queues=sabbyfooz --spring.rabbitmq.addresses=amqp://<USER>:<PASSWORD>@<HOST>:<PORT> --spring.rabbitmq.username=<USER> --spring.rabbitmq.password=<PASSWORD> --spring.cloud.stream.binders.rabbitBinder.type=rabbit --spring.cloud.stream.binders.rabbitBinder.environment.spring.rabbitmq.addresses=amqp://guest:[email protected]:5672 --spring.cloud.stream.bindings.output.destination=rabzysrcExternal RabbitMQ cluster credentials are supplied via --spring.rabbitmq.* properties.
The binder configurations are supplied via --spring.cloud.stream.binders.rabbitBinder.environment.spring.rabbitmq.* properties.
The prefix spring.cloud.stream.binders refers to the binder configuration properties while the name rabbitBinder is the configuration name chosen for this binder configuration.
You'd have to replace <USER>, <PASSWORD>, <HOST>, and <PORT> with external cluster credentials.
That's how two different RabbitMQ credentials are passed to the same application; one for the actual data and the other for binder configuration.
sabbyfoozis the queue from which we will be polling for new data.rabzysrcis the destination to which the polled data will be published.
Processor
To start the processor application, run the following command:
java -jar transform-processor-rabbit-2.1.0.RELEASE.jar --server.port=9002 --spring.cloud.stream.binders.rabbitBinder.type=rabbit --spring.cloud.stream.binders.rabbitBinder.environment.spring.rabbitmq.addresses=amqp://guest:[email protected]:5672 --spring.cloud.stream.bindings.input.destination=rabzysrc --spring.cloud.stream.bindings.output.destination=rabzysink --transformer.expression='''payload.toUpperCase()'''rabzysrcis the destination from which we will be receiving new data from the source application.rabzysinkis the destination to which the transformed data will be published.
Sink
To start the sink application, run the following command:
java -jar rabbit-sink-rabbit-2.1.0.RELEASE.jar --server.port=9003 --rabbit.exchange=sabbyexchange --rabbit.routing-key=foo --spring.rabbitmq.addresses=amqp://<USER>:<PASSWORD>@<HOST>:<PORT> --spring.rabbitmq.username=<USER> --spring.rabbitmq.password=<PASSWORD> --spring.cloud.stream.binders.rabbitBinder.type=rabbit --spring.cloud.stream.binders.rabbitBinder.environment.spring.rabbitmq.addresses=amqp://guest:[email protected]:5672 --spring.cloud.stream.bindings.input.destination=rabzysinkExternal RabbitMQ cluster credentials are supplied via --spring.rabbitmq.* properties.
The binder configurations are supplied via --spring.cloud.stream.binders.rabbitBinder.environment.spring.rabbitmq.* properties.
The prefix spring.cloud.stream.binders refers to the binder configuration properties while the name rabbitBinder is the configuration name chosen for this binder configuration.
You'd have to replace <USER>, <PASSWORD>, <HOST>, and <PORT> with external cluster credentials.
That's how two different RabbitMQ credentials are passed to the same application; one for the actual data and the other for binder configuration.
rabzysinkis the destination from which the transformed data will be received.sabbyexchangewith thefoorouting-key is where the data will finally reach.
Testing
This section covers how to test your stream.
Publish Test Data
To publish test data so that you have something to verify:
- Go to the management console of the external RabbitMQ cluster.
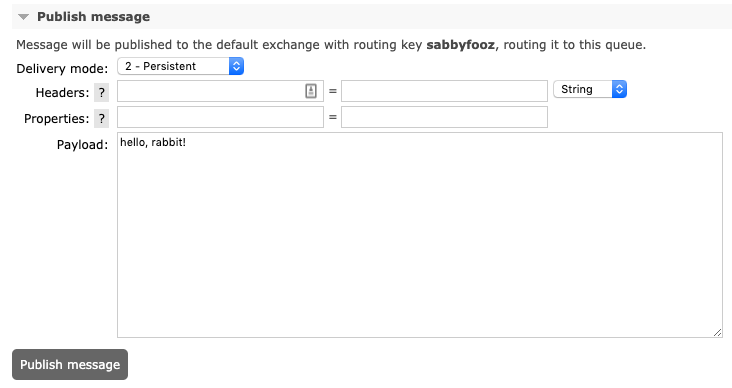
- Navigate to the
sabbyfoozqueue from the queues list. - Click
Publish messageto publish the test message (hello, rabbit!).

Verify Results
To verify the data you published:
- Go to the management console of the external RabbitMQ cluster.
- In this sample, the
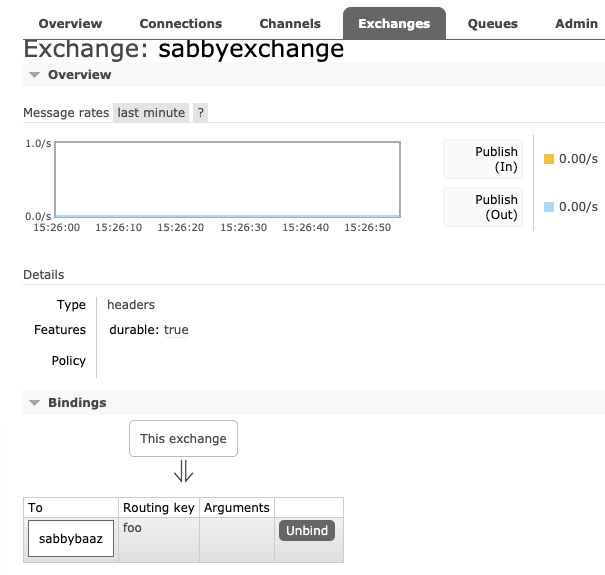
sabbyexchangewith thefoorouting key is bound to thesabbybaazqueue. You can then navigate to that queue from the queues list.
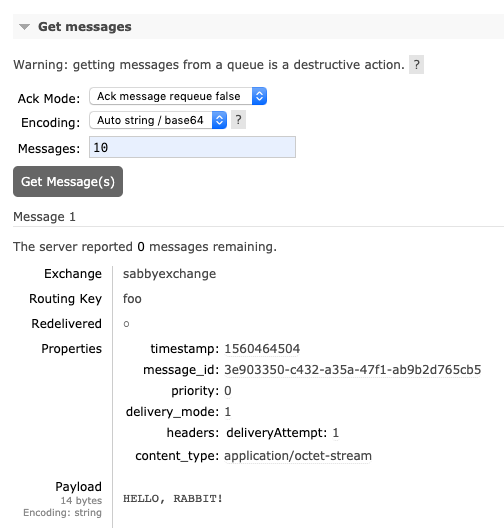
- Click
Get Message(s)to receive the incoming messages. - Confirm that the payload is transformed from lower to upper case (that is,
HELLO, RABBIT!).

You are done! This concludes the demonstration.